How to Customize WooCommerce With a Child Theme (In 3 Steps)
In this article, we’ll dig into the more advanced ways you can customize WooCommerce. We’ll show you what you need to know before starting and then take you through the process of updating your WooCommerce site’s checkout process.
WooCommerce’s customizable nature is a large part of what’s made it the most popular e-commerce solution for WordPress. Pretty much anyone can use WooCommerce features and extensions to create a store that suits their needs. However, if you’re a more advanced developer, you may want greater control over your website’s look and functionality.
If this sounds like you, it’s time to learn how to edit WooCommerce child themes and template files. This does require some prior knowledge of WordPress development. However, these techniques will enable you to customize your site’s checkout process and even create your own extensions.
A Brief Introduction to Customizing WooCommerce

WooCommerce has made it easy for pretty much anyone to create an online store in a matter of minutes. That’s a big part of why the plugin has become the most popular e-commerce solution for WordPress and is currently used to power nearly half of all e-commerce websites.
However, it’s not just the low barrier to entry that makes WooCommerce an attractive choice. Like the main WordPress platform, WooCommerce is incredibly customizable. You can use one of many existing child themes to improve your site and increase sales, for example, and you can even create your own child theme to further personalize your store’s appearance. In addition, there are plenty of extensions available to expand your store’s functionality.

Extensions are plugins that are specific to WooCommerce, which enable you to add to or alter its functionality. This is the most common and easy way to customize your store as it is a beginner-friendly and straightforward technique.
All of these methods combined enable you to create a stylish, functional WooCommerce site, even if you have limited knowledge of WordPress development. However, if you want to make a site that’s truly your own, you will need to dig a little deeper under the hood of WooCommerce.
To do that, you’ll need to learn how to work directly with WooCommerce template files. Let’s take a closer look at those now.
Why You Might Want to Customize WooCommerce Templates
If you have previous experience with WordPress development, you may already be familiar with template files. These are PHP files containing markup, which are used to create the structure of your WordPress site. For example, footer.php is a template file that determines the appearance and functionality of your site’s footer on the pages where it’s used.
Templates files are mainly included in WordPress themes, but plugins can add additional templates if needed. WooCommerce is one of them as it includes templates specific to online stores. For example, the single-product.php template is used to create product pages, while cart.php builds out the shopping cart page.
By editing these template files or creating new ones, you can customize WooCommerce to your liking. This gives you the control needed to manage every aspect of your store, including the shopping cart and checkout process. This is ideal if you’re a developer looking to create something unique or you don’t want to rely on existing extensions to do the job for you.
Working with template files and a WooCommerce child theme offers plenty of possibilities. However, it is also a relatively complex task. With that in mind, let’s talk about what you should know before dabbling in this type of WooCommerce development.
What You Need to Know Before Editing WooCommerce Templates
Before we get to the practical information, it’s important to make sure you have all the knowledge required. As we’ve mentioned, working with template files is a developer-level activity so the first thing you’ll want to have is a basic understanding of WordPress development.
It will also be very beneficial for you to have some experience with plugin development or to at least understand how plugins work. This is because customizing a WooCommerce template will involve working with hooks, such as actions and filters. Having prior knowledge of these concepts will therefore be immensely helpful.
Since you’ll be overriding the standard functionality in WooCommerce, it will also be useful if you have some familiarity with how WooCommerce works from a development perspective. Finally, you’ll need a child theme that you can use. If you don’t already have one set up, take a look at our tutorial for creating a WooCommerce child theme.
How to Customize WooCommerce With a Child Theme (In 3 Steps)
The time has come for you to start customizing WooCommerce. We’ll be using a blank child theme for the official Storefront theme in our examples.
Of course, you can customize WooCommerce to achieve a wide variety of goals. In this tutorial, we’ll look at how you can tweak the checkout process. For instance, you might want to make edits to the checkout fields or change the way the cart page appears.
We’ll show you a few ways you can do this by using your child theme and the WooCommerce template files. However, first, you’ll need to make some preparations.
Step 1: Declare WooCommerce Theme Support
Before you can make changes to WooCommerce, you need to make sure that your theme supports them. You do this by declaring theme support, which ensures that WooCommerce can use your edited templates to override the standard files.
In order to do this, you will need to edit your child theme’s functions.php file. This file enables you to add custom code to your site, and we’ll be returning to it throughout this tutorial. However, you’ll first need to include a function that declares theme support. You can use this snippet.
    							function mytheme_add_woocommerce_support() {
                  add_theme_support( 'woocommerce' );
                  }
                  add_action( 'after_setup_theme', 'mytheme_add_woocommerce_support' );
Paste that into your functions.php file and save it. At this point, WooCommerce will be able to override the standard functionality with the custom code you’ll be adding later. Speaking of that, it’s time to start adding your own code to the child theme.
Step 2: Add Custom Code to Your Child Theme’s functions.php File
As we mentioned in the previous section, the functions.php file enables you to add new code to your theme. You can use this opportunity to customize the functionality of your WooCommerce site in a few different ways, all by using hooks.
This is particularly useful if you want to make changes to existing content. One basic example would be to include a message that appears before the checkout form. You can do that by adding this code to your functions file.
    							add_action( 'woocommerce_before_checkout_form', 'checkout_message' );
                  function checkout_message() {
                  echo '<p>Please fill all required fields. Thank you!</p>';
                  }
Another possible use is adding the following code snippet to make the Phone Number field in the checkout process optional.
    							add_filter( 'woocommerce_billing_fields', 'my_optional_fields' );
                  function my_optional_fields( $address_fields ) {
                  $address_fields['billing_phone']['required'] = false;
                  return $address_fields;
                  }
This function uses a filter to set the billing_phone field as not required. You could also use this same principle to make other fields non-mandatory, if you wish. All you need to do is change billing_phone to the name of the field you want to make optional.
You can also remove fields entirely. Let’s say that you don’t need the Order comments field and want to delete it. Add this snippet to your functions file to do so.
    							add_filter( 'woocommerce_checkout_fields' , 'custom_override_checkout_fields' );
                  function custom_override_checkout_fields( $fields ) {
                  unset($fields['order']['order_comments']);
                  return $fields;
                  }
These examples demonstrate that it’s actually pretty simple to make basic changes to the WooCommerce checkout process. However, if you want to do something a little more complex, you can’t rely on the functions file alone. For that, let’s take a look at how you can create your own custom templates.
Step 3: Create a Custom Template
If you want to override one of WooCommerce’s templates, you can do so by creating a custom template file. Put simply, by creating a custom template, you can add new templates or completely change the functionality of existing ones. This is similar to how a child theme overrides its parent theme.
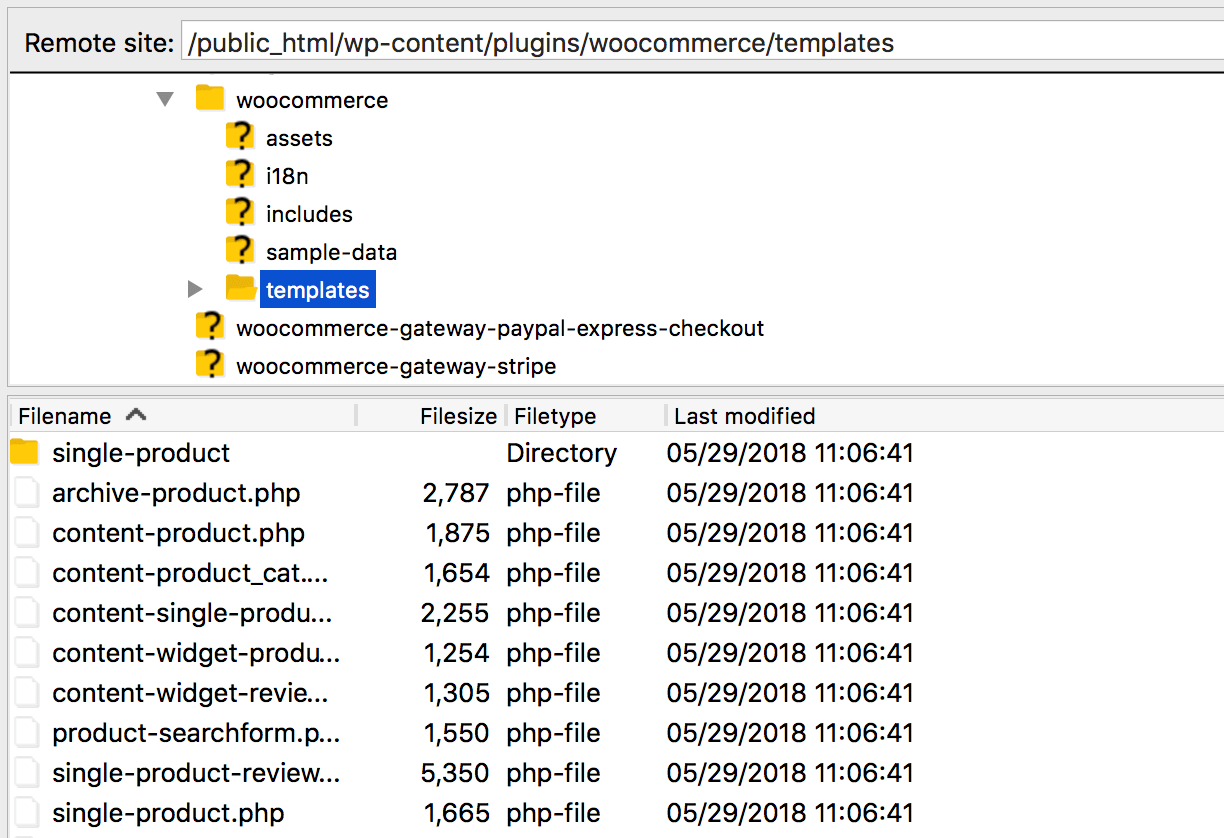
First, you will need to find WooCommerce’s existing template files. These are located in the directory called wp-content/plugins/woocommerce/templates.

Now, you’ll need to decide which template you want to use. Consider what you want to accomplish with your checkout process carefully and how you want it to change from the standard WooCommerce structure. For example, if you want to customize your product pages, you’d need to use single-product.php.
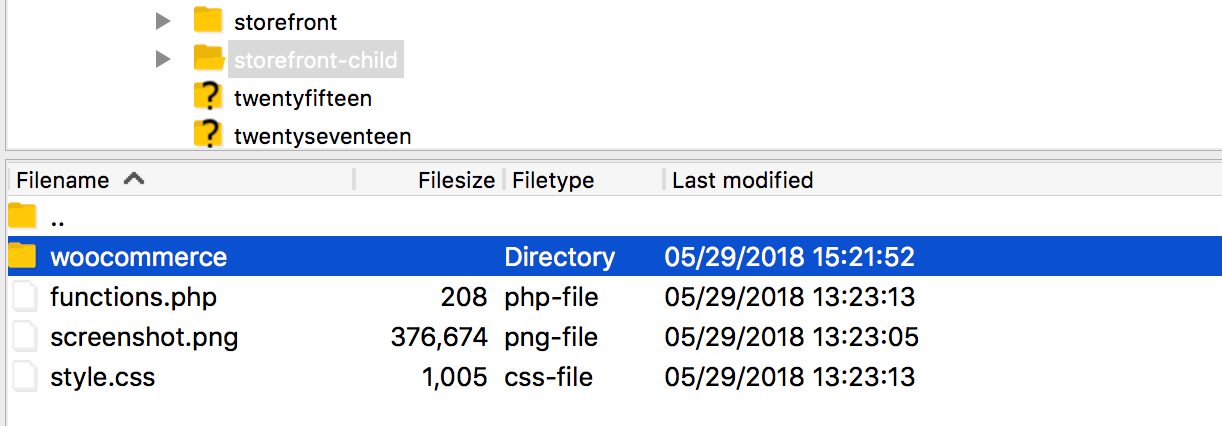
To create a custom file, you’ll need to create a new directory in your child theme. This should be called woocommerce, and needs to be placed in wp-content/themes/yourthemename/. This will ensure that any changes you make will not be erased when you update WooCommerce or your parent theme.

This new folder will be used to override the matching template files in WooCommerce. As such, the folder structure needs to match exactly as well. For example, if you want to edit the template file located in wp-content/plugins/woocommerce/templates/emails/, you should copy it and paste it into wp-content/themes/yourthemename/woocommerce/emails/.
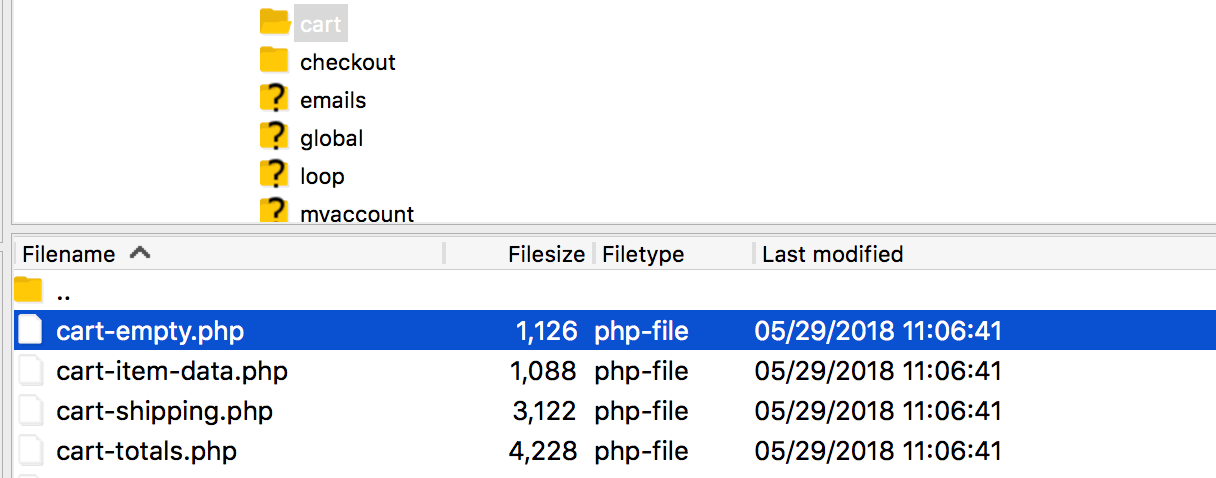
For a simple example of how you can edit a custom template, let’s look at the template file called cart-empty.php. You’ll find this in /plugins/woocommerce/templates/cart/.

This template determines how your shopping cart appears when no products have been added. By default, it will look like this:

As you can see, it only includes a basic message and a button. However, what if you wanted to replace that button with something else or just get rid of it altogether? This is where the template comes in.
Start by copying the cart-empty.php file and pasting it into wp-content/themes/yourthemename/woocommerce/cart/.

When you view the file, you’ll see that it contains a lot of comments with developer information. You can disregard those and instead focus on the following section.
    							if ( ! defined( 'ABSPATH' ) ) {
                  exit; // Exit if accessed directly
                  }
                  wc_print_notices();
                  /**
                  * @hooked wc_empty_cart_message - 10
                  */
                  do_action( 'woocommerce_cart_is_empty' );
                  if ( wc_get_page_id( 'shop' ) > 0 ) : ?>
                  <p class="return-to-shop">
                  <a href="<?php echo esc_url( apply_filters( 'woocommerce_return_to_shop_redirect', wc_get_page_permalink( 'shop' ) ) ); ?>">
                  <?php _e( 'Return to shop', 'woocommerce' ) ?>
                  </a>
                  </p>
                  <?php endif; ?>
This looks like a lot at a glance, but this snippet is simply using actions and filters to create the Return to shop button. This is what you’ll want to edit in order to change that feature. For example, you could just replace the button with a simple text string, by removing most of the code.
    							if ( ! defined( 'ABSPATH' ) ) {
                  exit; // Exit if accessed directly
                  }
                  wc_print_notices();
                  /**
                   * @hooked wc_empty_cart_message - 10
                   */
                  do_action( 'woocommerce_cart_is_empty' );
                  if ( wc_get_page_id( 'shop' ) > 0 ) : ?>
                  <p>There used to be a button here. It’s gone now.</p>
                  <?php endif; ?>
If you save the file and open the shopping cart in your store, you’ll see that the button is gone and the text snippet displays in its place.

You could also delete the entire if ( wc_get_page_id( 'shop' ) > 0 ) : ?> section if you wanted to.

This is a basic example, of course, but it should give you an idea of how templates can be used to customize the way different parts of your store look.
If you familiarize yourself with how WooCommerce uses templates by default, you’ll be able to take the concepts you’ve learned here today to customize your store without limits. You won’t need to rely on extensions anymore and can create a store that matches your exact requirements!
Conclusion
Digging into a website’s code isn’t for everyone. However, if you have the skills to do it, customizing your site can be a hugely rewarding endeavor. By editing WooCommerce child theme and template files, you won’t need to rely on extensions to make your site function exactly how you want it to.
